Availability
0% Finance - UK ONLY


> INFORMATION NOT AVAILABLE <
Frames available worldwide, including USA, Canada, Australia, shipped direct to your door from the Peak District.

This is the Archive product page for the 2016/17 FlareMAX Gen1. No Longer Available. Please Click Here for the current bike
This is the Archive product page for the 2016/17 FlareMAX Gen1. No Longer Available. Please
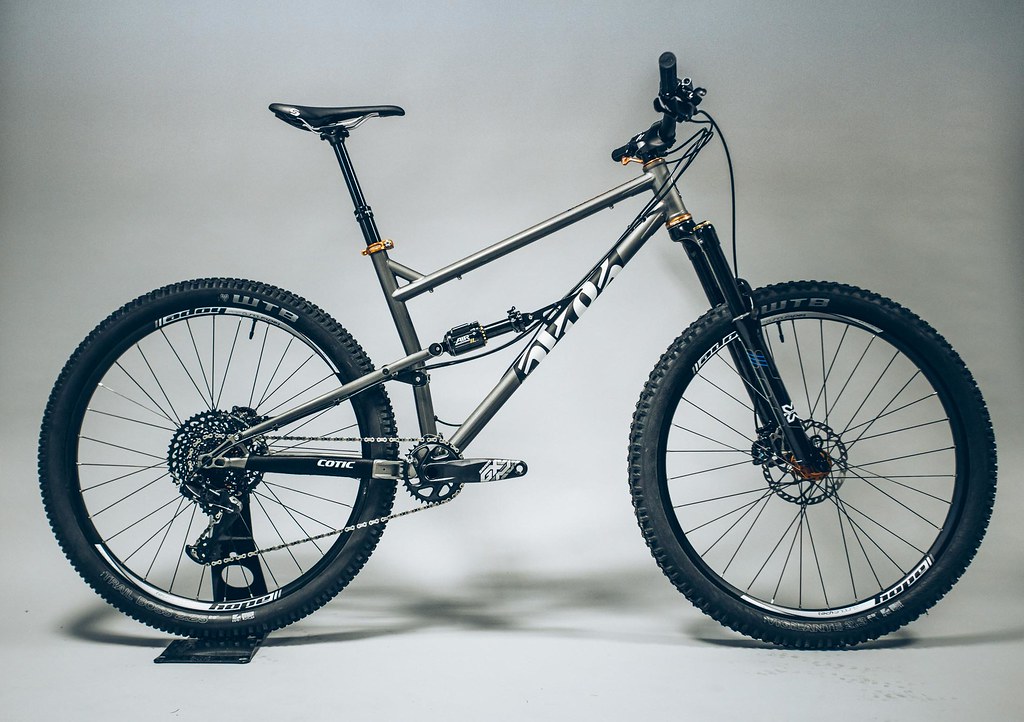
Combining the built-for-speed DNA of our Rocket enduro bike with the light, subtle feel of our much-loved Solaris, the FlareMAX delivers its own unique blend of speed and verve.
MAX by name, Maximum versatility by nature, the FlareMAX can run either 29 inch wheels with tyres up to 2.5" wide, or the latest Plus sized wheels in 27.5 x 2.8" width.
275 Plus wheels roll faster and offer more grip and security than regular 27.5" or 29" wheels, at the expense of slightly increased weight.
29" wheel compatibility offers you a huge range of tyre options, for every condition, and any purpose. You want fast? You've got fast. Any kind of fast you want.
The FlareMAX uses our proprietary droplink suspension system which brings together the grace, durability, clean lines, fun and interactive feel Cotic is known for while also being stiff, responsive and hugely capable - giving you the confidence to ride further and faster, no matter what the trail might throw at you.
Reynolds 853 delivers a fantastically robust and durable, long lasting front end, with the Ovalform top tube and head tube coming over from the Solaris. A light, thin wall down tube sheds weight from the frame compared to our harder hitting RocketMAX. As with all the droplink bikes, the Cotic custom designed heat treated seat tube gives incredible stiffness at suspension pivots to give you the confidence you need when cut and pasting your lines between the trees and rocks.
Steel is also used for the seatstays, which are completely bespoke to the FlareMAX. Its strength allows us to minimise the size of this part of the frame, maximising ankle, heel and calf clearance. Custom ultra slim titanium droplink pivot fittings complete the picture.
The swingarm is 7000 series aluminium. This allows us to create the complex shaped CNC machined parts required to thread through the area between the tyre and chainrings, and get as much structure as possible in the brace area for great stiffness at the back of the bike.
The details and latest trends are all covered: Boost148 bolt thru back end for maximum big wheel stiffness, taper steerer compatible head tube, sealed, capped and shielded pivots, ISCG05 mounts, right down the precisely located hose routing, plus internal and external routing for maximum dropper seatpost compatibility.
In short, it's a brilliant all round trail bike, more capable than you can possibly imagine. Fast, flowy and fun.
The FlareMAX is available as a multitude of fully customisable bikes in the UK, or as a frame with a choice of shocks worldwide.
Complete bikes start with our no nonsense Silver build, moves up to our high performance Gold level, and finally to the dream bike Platinum spec for all the toys. There are multiple upgrade options for each bike, including WTB Carbon wheels, so you can make your FlareMAX your own. For more information, click on the tabs below. Prices start at (price unavailable)
frame optionsFlareMAX is also available frame only with X-Fusion O2 or Cane Creek DB Air IL shock options. Prices start at > INFORMATION NOT AVAILABLE <
Are you in the UK and would like to demo a FlareMAX? Contact us via our Demo Page to organise a demo ride with us.
NOTE: there is a new FlareMAX now available, in four sizes.
If you want your suspension trail bike from Cotic with the lighter, livelier ride of the smaller 27.5" wheels, you need our Flare.
Like your wheels big, but your ride a little faster and tougher? A little slacker and more enduro? You need the RocketMAX.
Maybe you're more a hardtail rider, but like the versatility of the FlareMAX with 29er and 275 Plus wheels? Have a look at the SolarisMAX.
Read all about the development and features of the Cotic droplink suspension here.....


- Cotic OFI bike fit with long cockpit, corrected seat angle for dropper posts and carefully placed BB to combine stability with a fun, interactive feel.
- Reynolds 853 Ovalform and DZB tubed front end brings precision, durability and strength
- 44mm standard head tube designed with external bottom cup for taper steerer compatiblity and zero stack top cup for minimal stack height
- Custom Cotic designed 35mm heat treated cromoly seat tube for super stiff support for the main suspension pivots
- 31.6mm seatpost size is dropper seatpost compatible. The frame has external and internal 'Stealth' dropper post remote routing
- ISCG05 mounts on regular threaded bottom bracket bring drivetrain security and reliability
- Rear mech cable routed internally through the steel seatstay for clean lines and low noise
- 2x drivetrain compatible. Routing and swingarm clearance in place for double chainsets and Shimano Sideswing front entry front mech
- 7005-T6 aluminium swingarm with Syntace X-12 BOOST148 x 12 rear axle for maximum wheel stiffness on larger wheels.
- 15mm pivots for BB and droplink thru axle style linkage clamp keep the frame solid front to rear
- 1 bottle mount
- Clearance for big tyres - 29 x 2.5" or 27.5 x 2.8" PLUS tyres
- Geometry for speed, fun and interaction using 120 or 130mm forks. 67.5deg head angle and low 13.3" BB with 120mm fork
- 120mm of Cotic droplink suspension brings precision, fun and interaction via a strong progression rate on the linkage driven single pivot layout
- Sizes - Medium (17.5"), Large (19") or XL (20")
- Weight - Gold Spec Bike 30.3lbs w/o pedals
All our bikes are hand assembled to order here in the Peak District by Paul, Cy, Richard or Will. If there's anything on the spec you're not sure about, or don't need, give us a ring to discuss. We'd much rather leave something off you don't need and charge you a bit less than waste a perfectly good part you'll not use when we can put it on someone elses bike. Better for you, better for us, less waste, so better for everyone.
When ordering, you can choose key components to help you get the fit you want on your bike (contact us if you need help), but you can also go custom if you want to personalise your build still further. Many of our builds can be customised extensively, with headset, brake, wheel and fork travel options available.
Build Specification - Gold Eagle 29- SRAM Eagle GX 12spd, 10-50 Cassette
- SRAM Eagle GX Cranks, 175mm, 32t X-Sync 2 Chainring, GXP BB
- Deore XT M8000 Brakes, 180/180 rotors
- X Fusion McQueen Roughcut HLR 120mm, Boost110x15mm axle, taper steerer
- Cane Creek DB Air IL Shock
- Hope Hoops Tech XC wheels
- WTB Vigilante 29x2.3 TCS Light Fast Rolling, Trail Boss 29x2.25" Tough Fast Rolling. Set up tubeless.
- Finishing kit, including:
- Your choice of handlebar:
- Cotic Calver Bar - 780 x 25 rise
- Joystick Analogue Carbon - 800 x 20 rise, 223gms (+£100)
- Your choice of Stem from the following options:
- Cotic ShortStem 35mm
- Cotic ShortStem 45mm
- Race Face Ride 60mm x 6 deg
- Race Face Ride 70mm x 6 deg
- Hope AM 50mm (+£50)
- Joystick Builder 50mm (+£50)
- Joystick Builder 35mm (+£50)
- Race Face Turbine dropper seatpost, 125mm drop medium, 150mm drop large and XL
- Cotic Cromo Rail Saddle
- Hope Headset
- Pedals not included
- 0% Finance Now Available. Use the order page to calculate your payments.
- Price - (price unavailable) including UK mainland delivery
- Use the framebuilder to spec your bike
- SRAM Eagle GX 12spd, 10-50 Cassette
- SRAM Eagle GX Cranks, 175mm, 32t X-Sync 2 Chainring, GXP BB
- Deore XT M8000 Brakes, 180/180 rotors
- X Fusion McQueen Roughcut HLR 120mm, Boost110x15mm axle, taper steerer
- X Fusion O2 RCX Shock
- Hope Hoops Tech 35W Wheels
- WTB Ranger 27.5 x 2.8" Light Fast Rolling Front, Tough Fast Rolling Rear. Set up tubeless.
- Finishing kit, including:
- Your choice of handlebar:
- Cotic Calver Bar - 780 x 25 rise
- Joystick Analogue Carbon - 800 x 20 rise, 223gms (+£100)
- Your choice of Stem from the following options:
- Cotic ShortStem 35mm
- Cotic ShortStem 45mm
- Race Face Ride 60mm x 6 deg
- Race Face Ride 70mm x 6 deg
- Hope AM 50mm (+£50)
- Joystick Builder 50mm (+£50)
- Joystick Builder 35mm (+£50)
- Race Face Turbine dropper seatpost, 125mm drop medium, 150mm drop large and XL
- Cotic Cromo Rail Saddle
- Hope Headset
- Pedals not included
- 0% Finance Now Available. Use the order page to calculate your payments.
- Price - (price unavailable) including UK mainland delivery
- Use the framebuilder to spec your bike
- Shimano Deore XT M8000 1x11 Drivetrain, 11-46 Cassette
- Race Face Turbine Cinch 175mm Cranks, Direct Mount 30t Chainring
- Deore XT M8000 Brakes, 180/180 rotors
- X Fusion McQueen Roughcut HLR 120mm, Boost110x15mm axle, taper steerer
- Cane Creek DB Air IL Shock
- Hope Hoops Tech XC wheels
- WTB Vigilante 29x2.3 TCS Light Fast Rolling, Trail Boss 29x2.25" Tough Fast Rolling. Set up tubeless.
- Finishing kit, including:
- Your choice of handlebar:
- Cotic Calver Bars - 780 x 25mm rise
- Joystick Analogue Carbon - 800 x 20 rise, 223gms (+£100)
- Your choice of Stem from the following options:
- Cotic ShortStem 35mm
- Cotic ShortStem 45mm
- Race Face Ride 60mm x 6 deg
- Race Face Ride 70mm x 6 deg
- Hope AM Stem 50mm (+£50)
- Joystick Builder 50mm (+£50)
- Joystick Builder 35mm (+£50)
- Race Face Turbine dropper seatpost, 125mm drop medium, 150mm drop large and XL
- Cotic Cromo Rail Saddle
- Hope Headset
- Pedals not included
- 0% Finance Now Available. Use the order page to calculate your payments.
- Price - (price unavailable) including UK mainland delivery
- Use the framebuilder to spec your bike
- Shimano Deore XT M8000 1x11 Drivetrain, 11-46 Cassette
- Race Face Turbine Cinch 175mm Cranks, Direct Mount 30t Chainring
- Deore XT M8000 Brakes, 180/180 rotors
- X Fusion McQueen Roughcut HLR 120mm, Boost110x15mm axle, taper steerer
- Cane Creek DB Air IL Shock
- Hope Tech 35W Wheels
- WTB Ranger 27.5x2.8" Light High Grip Front, Tough Fast Rolling Rear. Set up tubeless.
- Finishing kit, including:
- Your choice of handlebar:
- Cotic Calver Bars - 780 x 25mm rise
- Joystick Analogue Carbon - 800 x 20 rise, 223gms (+£100)
- Your choice of Stem from the following options:
- Cotic 35mm Stem
- Cotic 45mm Stem
- Race Face Ride 60mm
- Race Face Ride 70mm
- Hope AM Stem 50mm (+£50)
- Joystick Builder 50mm (+£50)
- Joystick Builder 35mm (+£50)
- Race Face Turbine dropper seatpost, 125mm drop medium, 150mm drop large and XL
- Cotic Cromo Rail Saddle
- Hope Headset
- Pedals not included
- 0% Finance Now Available. Use the order page to calculate your payments.
- Price - (price unavailable) including UK mainland delivery
- Go to the Framebuilder to spec your bike
As well as being able to spec the post, bars and stem for the best possible bike fit, and upgrade the rear shock, our builds can additionally be customised by changing any of the following:
- Disc brakes: choose between 2 Shimano and 2 Hope options
- Wheels: upgrade your Gold build Hope 29 Wheels to Hope/WTB Ci24 Carbon Wheels
- Gearing: Swap to a 11-46 cassette for closer ratio gears or upgrade to the Hope 10-44 cassette to save some weight
- Switch your shock to a Cotic Custom Tuned X Fusion O2 RCX
- Many more options... click on the link below to see them all...
- GO CUSTOM based on a Gold build
- Shimano SLX M7000 1x11 Drivetrain
- Shimano SLX M7000 11-42 Cassette
- Race Face Affect Cinch 175mm Cranks, Direct Mount 30t Chainring
- Deore M615 Brakes, 180/180 rotors
- X Fusion McQueen RL2 - 120 travel, Boost 110x15mm axle, taper steerer
- Cotic Custom Tuned X Fusion O2 RCX shock
- Shimano SLX hubs on WTB ST i25 rims
- Continental Trail King 29x2.2"
- Finishing kit, including:
- Your choice of handlebar:
- Cotic Calver Bars - 780 x 25mm rise
- Joystick Analogue Carbon - 800 x 20 rise, 223gms (+£100)
- Your choice of Stem from the following options:
- Cotic 35mm Stem
- Cotic 45mm Stem
- Race Face Ride 60mm
- Race Face Ride 70mm
- Hope AM Stem 50mm (+£50)
- Joystick Builder 50mm (+£50)
- Joystick Builder 35mm (+£50)
- X-Fusion Manic dropper seatpost, 125mm drop
- Shimano SLX M7000 1x11 Drivetrain
- Shimano SLX M7000 11-42 Cassette
- Race Face Affect Cinch 175mm Cranks, Direct Mount 30t Chainring
- Deore M615 Brakes, 180/180 rotors
- X Fusion McQueen RL2 - 120 travel, Boost 110x15mm axle, taper steerer
- Cotic Custom Tuned X Fusion O2 RCX shock
- Hope Pro4 Boost148 Hubs on WTB Asym i35 rims
- WTB Trail Boss 27.5 x 3.0" TCS Light Fast Rolling, Ranger 27.5x2.8" Light Fast Rolling. Set up tubeless.
- Finishing kit, including:
- Your choice of handlebar:
- Cotic Calver Bars - 780 x 25mm rise
- Joystick Analogue Carbon - 800 x 20 rise, 223gms (+£100)
- Your choice of Stem from the following options:
- Cotic 35mm Stem
- Cotic 45mm Stem
- Race Face Ride 60mm
- Race Face Ride 70mm
- Hope AM Stem 50mm (+£50)
- Joystick Builder 50mm (+£50)
- Joystick Builder 35mm (+£50)
- X-Fusion Manic dropper seatpost, 125mm drop
- Cotic Cromo Rail Saddle
- Cane Creek 10 Headset
- Pedals not included
- Price: (price unavailable) including UK mainland delivery
- Use the framebuilder to spec your bike
As well as being able to spec the post, bars and stem for the best possible bike fit, and upgrade the rear shock, our builds can additionally be customised by changing any of the following:
- Headset: upgrade your Silver build to a Hope headset
- Discbrakes: choose between 2 Shimano and 2 Hope options
- Wheels: upgrade your Silver build to Hope 29 Wheels, or Hope/WTB Ci24 Carbon Wheels
- Gearing: Upgrade to a Hope 10-44 cassette for wider range gears
- Increase your fork travel to 130mm
- Many more options... click on the link below to see them all...
- GO CUSTOM based on a Silver build
NOTE: Specifications subject to change without notice. Because of this, bikes shown in videos and photos are likely to feature a different spec to that currently offered.
The chart is a guide to frame size. OFI Geometry means that the frames are low and long, with plenty of standover room. You can take this two ways: You can either have a regular position coupled with a small and chuckable frame, or you could go for the next size up and go long and racey with a short stem without feeling like you're riding a gate. Make sure you consider your leg length as well. If you upsize you might not be able to fit a dropper post with 150mm drop due to the collar hitting the seat tube top. You lot are just too different to say for sure, so drop us a line at size@cotic.co.uk and we'll be happy to discuss set up based on what you're riding at the moment.
120mm travel forks
| Frame Size | Medium | Large | XL |
|---|---|---|---|
| Seat Tube (centre-top) | 440mm | 480mm | 505mm |
| Top Tube Length (Effective) | 612mm | 632mm | 648mm |
| Head Angle | 67.3° | 67.3° | 67.3° |
| Seat Angle | 74.4° | 74.4° | 74.4° |
| Chainstay Length | 447.8mm | 447.8mm | 447.8mm |
| BB Drop | -34mm | -34mm | -34mm |
| Head Tube Length | 110mm | 120mm | 130mm |
| Reach | 443.1mm | 459.6mm | 472.31mm |
| Stack | 613.8mm | 622.9mm | 632.1mm |
| Wheelbase | 1184mm | 1208mm | 1225mm |
| Usual Height Range | 169cm - 180cm | 178cm - 188cm | 186cm - 195cm |
| Stem Length | 45-70mm | 45-70mm | 45-70mm |
| Frame Wheel Travel | 120mm | 120mm | 120mm |
| Wheel Size | 29" or 275/650B PLUS | 29" or 275/650B PLUS | 29" or 275/650B PLUS |
| All measurements are static based on 120mm travel fork. | |||
4 ¾" travel forks
| Frame Size | Medium | Large | XL |
|---|---|---|---|
| Seat Tube (centre-top) | 17.5" | 19" | 20" |
| Top Tube Length (Effective) | 24.1" | 24.9" | 25.6" |
| Head Angle | 67.3° | 67.3° | 67.3° |
| Seat Angle | 74.4° | 74.4° | 74.4° |
| Chainstay Length | 17.6" | 17.6" | 17.6" |
| BB Drop | -1.35" | -1.35" | -1.35" |
| Head Tube Length | 4.3" | 4.7" | 5.1" |
| Reach | 17.45" | 18.15" | 18.65" |
| Stack | 24.15" | 24.5" | 24.85" |
| Wheelbase | 46.6" | 47.5" | 48.2" |
| Usual Height Range | 5ft 6in - 5ft 11in | 5ft 11in - 6ft 2in | 6ft 1in - 6ft 5in |
| Stem Length | 45-70mm | 45-70mm | 45-70mm |
| Frame Wheel Travel | 4.7" | 4.7" | 4.7" |
| Wheel Size | 29" or 275/650B PLUS | 29" or 275/650B PLUS | 29" or 275/650B PLUS |
| All measurements are static based on 120mm/4.7" travel fork. | |||
130mm travel forks
| Frame Size | Medium | Large | XL |
|---|---|---|---|
| Seat Tube (centre-top) | 440mm | 480mm | 505mm |
| Top Tube Length (Effective) | 614mm | 634mm | 650mm |
| Head Angle | 66.9° | 66.9° | 66.9° |
| Seat Angle | 74.0° | 74.0° | 74.0° |
| Chainstay Length | 447.8mm | 447.8mm | 447.8mm |
| BB Drop | -31mm | -31mm | -31mm |
| Head Tube Length | 110mm | 120mm | 130mm |
| Reach | 438.1mm | 454.6mm | 467.3mm |
| Stack | 617.8mm | 626.9mm | 636.1mm |
| Wheelbase | 1188mm | 1212mm | 1229mm |
| Usual Height Range | 169cm - 180cm | 178cm - 188cm | 186cm - 195cm |
| Stem Length | 45-70mm | 45-70mm | 45-70mm |
| Frame Wheel Travel | 120mm | 120mm | 120mm |
| Wheel Size | 29" or 275/650B PLUS | 29" or 275/650B PLUS | 29" or 275/650B PLUS |
| All measurements are static based on 130mm travel fork. | |||
5" travel forks
| Frame Size | Medium | Large | XL |
|---|---|---|---|
| Seat Tube (centre-top) | 17.5" | 19" | 20" |
| Top Tube Length (Effective) | 24.2" | 25.0" | 25.7" |
| Head Angle | 66.9° | 66.9° | 66.9° |
| Seat Angle | 74.0° | 74.0° | 74.0° |
| Chainstay Length | 17.6" | 17.6" | 17.6" |
| BB Drop | -1.2" | -1.2" | -1.2" |
| Head Tube Length | 4.3" | 4.7" | 5.1" |
| Reach | 17.25" | 17.95" | 18.45" |
| Stack | 24.25" | 24.6" | 24.95" |
| Wheelbase | 46.45" | 47.7" | 48.35" |
| Usual Height Range | 5ft 6in - 5ft 11in | 5ft 11in - 6ft 2in | 6ft 1in - 6ft 5in |
| Stem Length | 45-70mm | 45-70mm | 45-70mm |
| Frame Wheel Travel | 4.7" | 4.7" | 4.7" |
| Wheel Size | 29" or 275/650B PLUS | 29" or 275/650B PLUS | 29" or 275/650B PLUS |
| All measurements are static based on 130mm/5.1" travel fork. | |||

The suspension on your Cotic droplink bike is designed to work at its best when the suspension sags with the rider on board the bike. 'Sag' is the amount the shock compresses with a rider on board. The suspension works at its best when set with between 25% and 30% of the available travel as sag, with our preferred starting point being 30%.
Your FlareMAX Gen1 has a 50mm stroke shock, so that means:
- 13-15mm sag on the shock
- 24-30mm sag on a 120mm fork
- 26-32mm sag on a 130mm fork
- 28-35mm sag on a 140mm fork
As a starting point we suggest going for the middle of those options, so 14mm sag rear, and front sag of 27mm (120 fork), 29mm (130 fork) or 32mm (140 fork).
How To Set Your Shock Sag
Using a shock pump, put 170psi in the rear shock. Leave your forks as they are (if you've already set them up) or put the recommended pressure for your weight in them according to the fork manufacturer's manual.
Check the shock and turn off any lockout or Climb Switch. This allows the shock to compress unhindered and ensures a more accurate sag measurement.
Put your riding kit on. Or at least a fully loaded backpack if you usually ride with one. Make particular note of the amount of water in your pack or your bottles. It's probably the heaviest thing you strap to your bike after yourself, and it makes a difference to the suspension setup.
Set the saddle to your correct full pedalling height.
Mount the bike and go for a quick ride in a suitably quiet area. Whilst riding, bounce on the saddle a couple of times to get the rear shock compressing as much as you can.
Pull in somewhere safe, stop, get off the bike and slide the o-ring on the shock down against the seal. Now get back on the bike and with saddle at full height sit down and let your legs dangle off the pedals and make sure the o-ring on the shock is still up against the seal. Now, gently get off the bike without moving the shock (dropping the saddle and using a kerb or something as step helps).
Once off the bike, measure the distance between the o-ring and the shock body. Adjust the air pressure in the shock accordingly to get the desired amount of sag.
How To Set Your Fork Sag
Once youve set the rear sag, check the front fork sag. If your bike is brand new, put 60psi in the fork to start with and dial all the compression damping adjuster to minimum. For forks, we recommend running with 20-25% sag.
In a quiet area with minimal traffic, drop the saddle and ride around slowly, giving the forks a bounce once or twice to free them up. Whilst rolling along, sit down and being careful of the spinning wheel - slide the o-ring on the fork leg down to the seal. Now stand up slowly into a balance position on the bike as if you're about to do a downhill section of trail. Now, without moving the fork any more, move yourself rearward and sit down, and slowly roll to a halt. If you have to use the brake, use it very gently and carefully so that you don't dive the fork under braking and mess up your sag measurement. Gently get off the bike and measure the distance from the o-ring to the fork seal. That is your sag. For a 130mm fork, you should be aiming for around 26-32mm sag (20-25%).
If the fork sag requires alteration, alter it, then check the rear sag again. Keep doing this procedure until both front and rear sag is set as desired by the rider, within the manufacturer recommendations for the frame and fork.
Weight Distribution
Its worth noting that as the weight distribution of all bikes is different, being dependent on saddle position, stem length and bar width amongst many other things. Its quite possible that with the correct sag at the rear of the bike, your forks may end up with too much or too little sag because theres more or less weight on them compared to your previous bike. This is why we don't recommend any particular pressures, because even quite subtle differences in your saddle/cockpit set up compared to anything we measure will result in different pressures being required for a given level of sag. We always recommend setting up using sag measurement as your guide, not a generic shock pressure.
How To Set Damping - Shock
Once the front and rear sags are set, adjust the rebound and compression damping to your preference. If you have specified the Cane Creek shock, then our base setup is on the shock when it's delivered. These settings are listed below all relative to fully open position on the adjusters:
DB Air IL
- 1 x large volume spacers
- 1.0 Turns HSC (High Speed Compression)
- 6 Clicks LSC
- 1.0 Turns HSR
- 4 clicks LSR
Follow the excellent instructions in the Cane Creek Field Tuning Guide (click here to download) for fine tuning of your Cane Creek shock.
Cotic base settings tend to run on the lively and fast rebound side of things. This might feel quite different to what you were previously used to, but do stick with it for a couple of rides before making changes. Light rebound damping let's the rear wheel 'patter' and maintain traction better. The links to the base tune for your Cane Creek shock can be found above in the Component Sizes tab.
For other shock brands:
Rebound
It is recommended to start with the rebound 3 clicks from fully open. As mentioned above, we believe that the fastest rebound you can run with safely is the best for traction and lively feel. If you feel like youre being bounced out of the saddle on big compressions, or springing back too hard off drops, or the bike feels like its bouncing back at you at high speed on rocky sections, then add more rebound damping until this sensation is eliminated.
Compression / Pedal Platform
It is recommended to start with the compression damping/pedal platform switched off (or set to minimum). The Cotic Droplink suspension is designed not to require the assistance of a compression damping circuit to give good pedalling performance. Using the minimum setting allows the suspension to move under bump forces more easily and track the ground better.
How To Set Damping Fork
As with the rear shocks, we recommend running the fork damping as light as possible for best traction.
Rebound
Set this in the middle of the range and see how it feels matched up to the rear shock. As with the rear, try riding it faster than you ordinarily would. It's amazing what a difference it makes, and it's key to getting the most out of the fast acting rear shock, because it keeps the bike in balance.
Once you have done a couple of rides, if you feel the in higher speed bumpy trails the fork is kicking back too much for your liking, or too much that you lose confidence, then increase the rebound damping. If you find the middle setting OK, trying making it faster until you get to the point of it feeling sketchy, then go back one click.
Compression
Almost regardless of size, weight or style of riding, everyone at Cotic runs the high speed compression damping on their fork fully open, or very close to it. We recommend you start with fully open and go from there. If you find you are using the full travel a little too easily for your liking, we suggest adding 1 volume reducer to your fork air spring rather than ramping up the damping.
For low speed compression damping, this is a balance between traction and helping keep the fork held up, so for this we recommend starting with it set in the middle of the range. If you are finding that the bike feels confidence inspiring, but it's a little uncomfortable or 'chattery' through your hands, try reducing the low speed compression 3 clicks. If you feel that the sag and air spring feel is what you want but you are getting a lot of diving under heavy braking, or in steep terrain, try adding 3 clicks. Keep refining like that until you are happy with the setup.
A Bit of Advice
One thing to avoid is setting the rebound based on the 'bounce in the street' test. This usually results in setting the rebound too slow for good grip in trail riding conditions, because doing the 'bounce test' with rebound set fast enough for good performance usually feels too fast in this unhelpful scenario. Only start adjusting once you have a feel on the trail.
Try It Out The Only Way You'll Know Is By Going For A Ride
We recommend starting at 15mm shock sag and going for a couple of rides to see how this feels. This is a good middle ground for tackling the trails with an active, plush feel combined with a low bottom bracket height for confident handling.
If you feel that youre catching your pedals too often, or the steering isnt as fast as youd like, or you're not getting the climbing position you want, then add more air to the shock and reduce the sag 1 or 2mm, or maybe drop the sag on your fork a few extra millimetres to move your weight forward.
It's well worth taking a couple of hours and doing laps of a trail you know well, and making changes one at a time. A good way to learn it to turn one damping dial fully closed, do a run, then go again with it fully open. You will learn what these big changes to damping do to the bike, which will help you make more subtle changes afterwards.
Take Some Notes Before Tweaking
With all the adjustments available on modern suspension its quite possible to get lost chasing a set up and ending up with a bike that doesnt handle too well. So, if youve twiddled and tweaked and the handling just seems to be getting worse, go back to your base setup.
Dont be afraid to experiment with your suspension settings and general bike setup (stem length, bar height, etc), but always have a base set up written down that you can go back to. This should include a fork travel (if the fork is adjustable) with air pressures for front suspension units. Note down how many clicks of rebound you're running. Same goes for compression damping if its adjustable on your fork.
As your experience grows, youll begin to know what certain adjustments do and how to undo them, but its a learning curve so keep your head and dont be afraid to start from scratch.
We really think you could get more out of your bike by playing around with things a little. We're always happy to help if you want advice. Just drop us a line at info@cotic.co.uk
Our service doesn't stop when you order a frame. We want to help you enjoy your new bike to its full potential.
Seatpost diameter: 31.6mm (get 380mm long minimum)
Front Mech: 34.9mm (Shimano Side Swing high clamp only [click here for info])
Fork: Maximum 130mm travel, 541mm axle-crown (without sag)
Bottom Bracket width: 73mm
Bottom Bracket thread: Conventional English/BSA
Chainguide Mounting: ISCG05
Headset: 44mm for Taper Steerer forks: Hope 2H, Cane Creek ZS44 Top/EC44 Bottom, Chris King Inset I7
Rear Hub: Boost148 x 12 bolt through
Rear Axle: Syntace X-12
Rear Mech Hanger: Syntace X-12 Type 1 (Conventional or Shimano Direct Mount)
Shock: 200 x 50 or 51
Shock Fittings: 15.75 x M8 Down Tube End, 19.0 x M8 Seatstay End
Dropper Post Routing: Both external under the top tube, and Stealth via the down tube.
Rear Brake Mounting: I.S. Compatible with up to 203mm diameter rotors